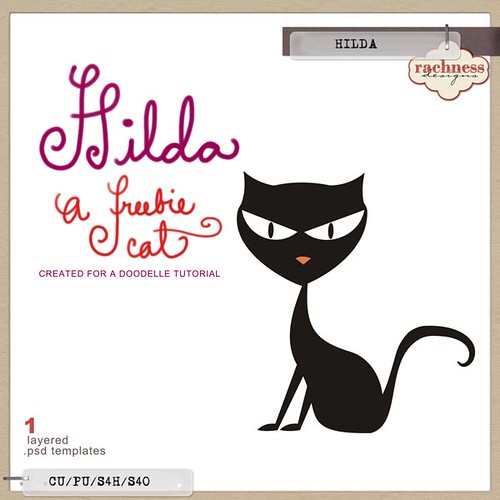
Since Haloween is just around the corner, let’s color this freebie, mean-looking cat. Download the evil kitty - let’s name her Hilda! :
Unzip the file and open the .psd in Photoshop. I can now see Hilda in all her layered glory.
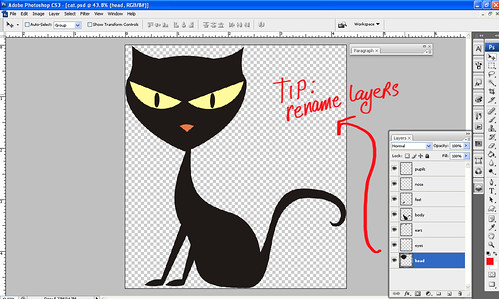
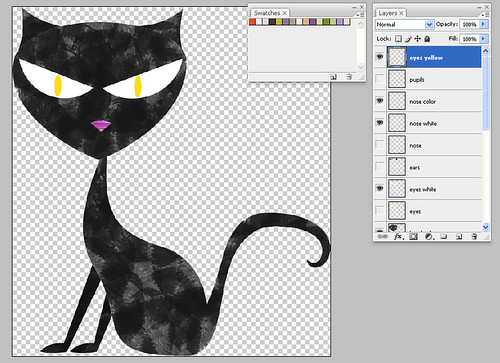
For this tut, let’s pretend that I did not draw Hilda and just downloaded her like you did. So what I do first is to check out her layers. Click on the eye icon beside the layers on the layer palette to turn on and off so I can see which of Hilda’s body parts are layered. She is made up of 7 layers– head, nose, feet, body, ears, eyes and head.
I proceed to rename the layers according to her body parts. I always rename my layers when coloring– this saves me time tracking down the layer I need to color (without having to constantly clicking on the eye icon on the layer palette to find the layer I need!).
I then come up with a color swatch. Since Hilda is a pretty simple doodle, choosing her colors won’t be rocket science. I want her to be midnight black, with sinister, glowing yellow eyes and… a purple nose, in keeping with the Haloween theme. At this point, I load my color swatch. I now am ready to start coloring.
I color bottoms up– meaning I start coloring on the bottom-most layer and work my way up. In Hilda’s case, the last layer is her feet. So I select the feet layer’s pixels (shortcut: while pressing CTRL click on the head thumbnail on the layer palette).

Now, I see the marching ants around the feet. This means that the feet is now selected. With the ants marching I then create a new layer above it and fill it with white. (See screencap above).
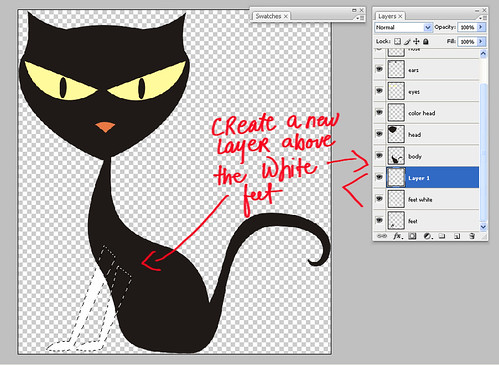
Hilda’s feet is now filled with white. I create another layer above this white layer. I will then rename the white layer as “feet white”, and the layer above this will be “feet color”.
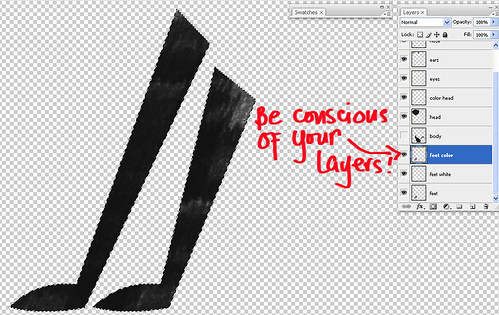
So with the ants still marching around “feet white”, I click on the “feet color” layer. Then I “hide” the original (black) feet layer by clicking on the eye icon beside its layer. I don’t want to delete her just yet, I just want to hide her.
Now, I have two ways to color Hilda here. I can use brushes or fill her with color and then clip overlays. Since we already covered the color fill (or flood fill) and clipping overlays in the first part of the tutorial, I’ll tackle brushes this time around.
For this tut, I’ll load a set of crayola brushes from Amanda Rockwell. Of course, you can use any brushes you wish.
I now brush on the “feet color” layer. I can see the “crayola look” coming out as I alternate in stroking, clicking, stamping all over Hilda’s feet. Since I’m using a pen and tablet, I alternate the pressure in brushing the color. I can almost hear Hilda purring from all the stroking (hehe).
In the screencap above, I just temporarily hid the “body” layer so I can completely color her feet. I now move on to Hilda’s body.

I just practically repeat the same process all the way to the topmost layer– selecting the original black layer, creating a new one above it and filling it with white, then creating a new color layer above the white layer so I can brush color onto it. I proceed to repeat this on all layers going to the top. I just use different colors for the eyes, nose and the pupils.
So this is how Hilda looks like now all brushed up now:
She looks perfectly sinister now. But I love to texturize and pop up my drawings with dimension! It just makes things look more interesting, kwim?So I now apply layer “fx” (inner shadow+inner glow) and clip overlays and textures over Hilda. (I explained how to do this in my previous post).
After playing around, this is now how Hilda looks like in the “after” shot:
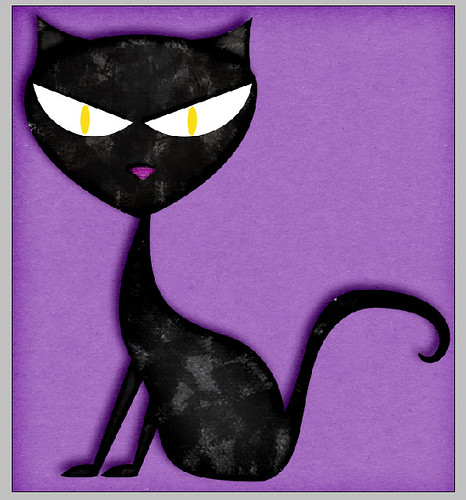 Now, this version of Hilda is the result of this concoction: brushes + clipping overlay/texture + layer fx (inner shadow + inner glow) + clipping shadows. I just slipped a kraft paper behind Hilda (courtesy of Flerg’s kraft layer styles).
That’s just one of the many formulas you can whip up to color Hilda. How about this:
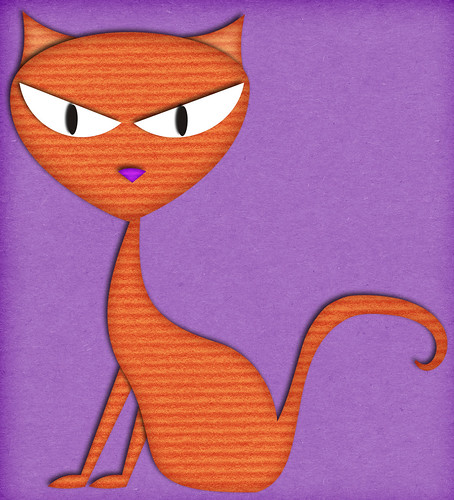 In the screencap above, Hilda looks like she’s been paper-pieced. The recipe: flood fill each layer with orange color + clipped cardstock textures over each layer (blending mode set to Multiply) + layer fx (inner shadow/inner glow) + clipped shadows on each layer = one mean paper-pieced cat!
Another method of coloring doodles is to use the Burn and Dodge tool. Check out the screencap below to find out where it’s located on the toolbox if you don’t know yet where it is.
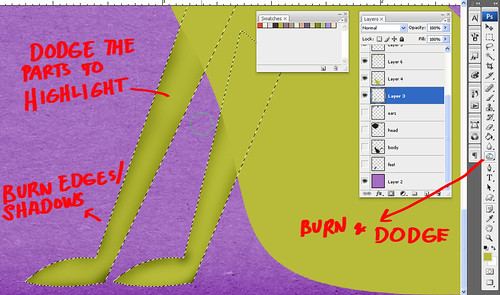
As the name suggests, the Burn tool will create dark areas, “burning” them, while the dodge will create highlights. This is similar to the inner shadow+inner glow effect, only with the Burn+Dodge tools, you can manipulate the shading, and choose which areas to darken and which to highlight.
As you can see in the screencap above, I “burned” the edges and Hilda’s joints, and other areas where shadows should naturally be.
Just be careful with the burning– don’t set the exposure too high (it’s at the menu bar) or your shadows will be toasted (too dark). Just play around, fiddle and experiment. That’s how I learned to use Photoshop!
You don’t have use the Dodge tool on each layer. It’s all up to you and what is pleasing to your eye. Here is how Hilda looked like after I burned and dodged her:

Here’s another one, a more textured Hilda:

The one above I colored using brushes that give the effect of acrylic. Same process as I explained in this post, only I used a different set of brushes. Lovely, isn’t she? I am currently addicted to the heavily textured look.
So there you go! One doodle, four different results. There are several more ways of coloring a doodle. If you google “how to color in Photoshop”, you’ll see what I mean. But for now these four ways are the ones I most often do.
I hope you found this tut most useful! I’ll try to see if I can whip up more tuts in the future. By the way, Hilda is for commercial use/s4h/s4O, so go ahead and use her in your designs (standard TOU restrictions apply). Just make sure you’ve dolled her up pretty good before redistributing her.
Oops, I almost forgot! Lynne-Marie – one of the fab trio who runs ZZS (the other two being Annick and Rita) – sent me a preview of her latest kit “Kraftprints” in which she used the doodles from my Doodle Mix 1 (the owl, the 2 trees at the back, fence, and the apple). The doodle pack is available for purchase at STS and ZZS.

She did such a fab, fab job in customizing my doodles! I believe Lynne-Marie clipped overlays/textures over them and added shading and shadows. Neat! I so love, love! Thank you Lynne-Marie! (According to Lynne-Marie, Kraftprints is currently available at Catscrap as an exclusive but will be sold at ZZS by mid-December.)
I do love to see how designers are making use of my artwork. I believe that is the highest compliment I can get– when I see others using it.
So please, if you have purchased and used any of my doodles (or the freebies) in any of your designs - whether hybrid/papers/crafts or stationeries, or in blog headers, digital scrapbook kits, or cards, and whatnots– please share the pictures or previews with me! I would love to blog about it and show it off here :-)
Now, to respond to a couple of points raised by those who croaked in my previous posts:
Which reminds me– aside from Manda K, would anyone else like to see their names “doodled” by me? That would be a good idea for a giveaway prize :-)
That sounds like a nifty software, Lainey! Thanks for mentioning it. It’s much easier than cut and paste, and I do like .pdf’s better than .doc’s. They open faster. I hope they’re free :-)
To Pa Mam– I fixed the link to the first tutorial’s freebie. Go back to that post here and you should be able to download it now.
So that’s it for now folks! Do hang around– the freebies, doodle packs, giveaways (and maybe more tuts!) will continue in the next few days :-)


8 croaks:
at: October 17, 2009 at 11:35 PM said...
Also congrats to all the winners..you will love the doodles!!
Rach-WE WOULD love to have our names doodled!!!! I think those would be awesome signatures in emails/blog posts, etc. Pretty PLEASE?????
HUgs and KISSES!
Tammy & Shelby
at: October 17, 2009 at 11:35 PM said...
PS. Thank you for the tutorials....learned some things I didn't know before!!!!
Tammy & Shelby
at: October 18, 2009 at 12:20 AM said...
Oh dear you're so kind thank you so much for fixing the link for me. I did dowload there again but still not working..just let you know ..please don't go fix it again I don't want to waste your time. I can follow your tutorial step by step by using another one of your doodle.
Thank you so much for these great tutorials I've lerned much more from these.
at: October 18, 2009 at 7:03 PM said...
I love this very evil-looking cat. He looks even more evil when he's colored. Thank you so much.
And, the tutorial is wonderful. I have printed it and appreciate these wonderful ideas.
I, too, would love to see my name as a doodle.
at: October 18, 2009 at 8:25 PM said...
Gorgeous cat! Thank you
at: October 18, 2009 at 9:34 PM said...
Please doodle me me ME!!!
really want to write longer but can't :(
internet connection here is so bad and expensive....
will write longer soon!
P.S. LOVE YOUR TUTS! (eventhough I'm not even using photoshop! LOL!)
P.P.S. quick Hi to PaMam ja! XOXO!
at: October 19, 2009 at 11:50 PM said...
Awesome!!! wow.... I didnt know that there were so many ways to do a doodle! lol. I like the orange cat with the cardstock texture the best. Guess that is the paper in me speaking. hehehe
And Rach, you are such a sweetie! You take the time to write up a tut and then respond to all the comments also. ahhhh... <3
Of course I would LOVE my name doodled. It would be interesting to see since there arent many beautiful letters in Sarah. Usually just the s. Blah name. That is a great idea for a giveaway though.
Have a great week!!!
at: November 25, 2009 at 8:49 PM said...
Hi! This post is likable and your blog is very interesting, congratulations!
add your
Post a Comment