Thank you to all the ladies who "croaked" in my previous post for a chance to bring home for free Doodle Mix 1. I wish I can give the pack to all of you!
So here goes:
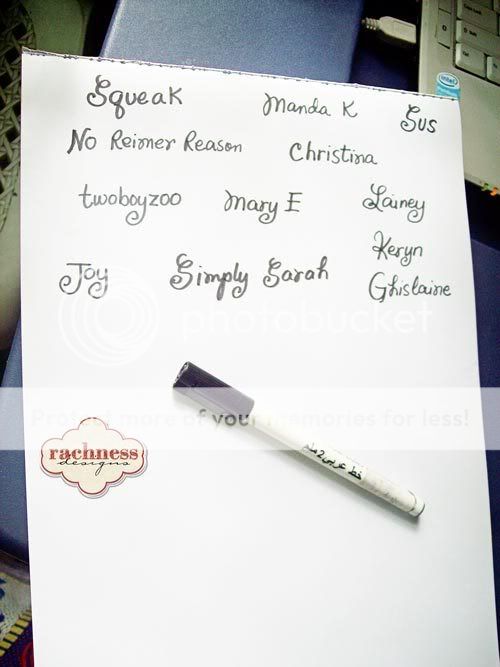
I'm doing this the old-fashioned, scissor-and-pen way. I wrote down the names of those who "croaked"(pic above). Then cut 'em up, folded each piece and dropped them in my cool-looking container:

Gave it a little shake then reached inside with eyes shut and drew out :

Congratulations, Sarah! You get for free Doodle Mix 1! How cool! Email me asap so I can send you your prize (my addie is on my sidebar).
You can purchase Doodle Mix 1 over at Scrap-Team Shop and Zig Zag Scraps.
I think Sarah is meant to be the winner for this giveaway because she has been hinting for some time now that she'd like to learn how to color my doodles. So I whipped up a tut for this post. I'm afraid I couldn't make it a short tutorial, as the most effective ones are those that are peppered with step-by-step images. Instead, I'll just try to make it as clear as possible. Read on...
Edit: TJ, I just found your comment after I published this post. I'll give you an additional "entry" to my next giveaway raffle draw. :-)
********
There are a gazillion ways on how you can customize my doodles. Especially since most of my doodle packs come in two formats- layered, .psd (Photoshop) and lineart (outline) .png.
Personally, I find the lineart .png's the quickest to color. But I have more fun with the layered .psd templates as they are more versatile and I have more options in customizing the drawings.
I broke down the How To Color tutorial in two parts. For the first part, I'll show you how I color the lineart .png. I'll tackle the layered .psd's in the second part (next post).
Please take note that I'm using Photoshop CS3 in this tutorial, so some instructions may be different if you are using either another graphic program or a lower or higher version of PS.
Also, click on the images below if you want to see them bigger.
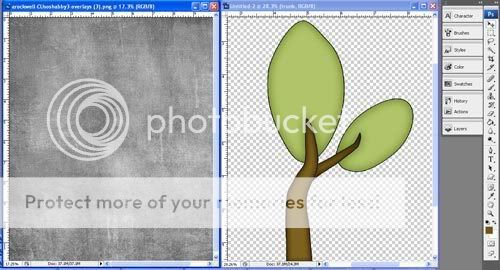
Ok first, open a lineart .png file. I used this tree which is one of the doodles you can find in my Doodle Mix 2 pack (now available at ZigZag Scraps, but more of that in my next post too).

I dragged the drawing to a 12x12, 300 dpi file. It's easier to color them this way.
I created a layer underneath the doodle. I like to rename my layers so it's easier for me to find the layer that I need.
Using the magic wand, I clicked inside all the parts of the tree that need to be colored. In this case, the two huge leaves and the trunk and branch. Before clicking, make sure you are on the doodle layer and not on the new layer underneath it. Now the ants start marching inside the outline.
With the ants are marching, click Select, Modify, Expand.

The Expand Selection box pops up. I put in 2.
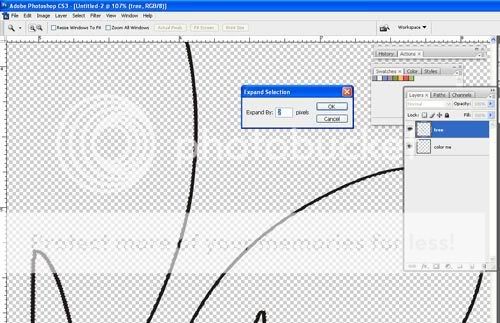
Anything between 1 and 2 should be ok. What this does is it expands your selection to overlap into the line, so that when you start coloring, there won't be a gap between the outline and the color.

You can see in the screencap above the selection reaching into the outline, but not going beyond it. I want the insides of the drawing fully colored end to end, cover to cover :-) Just remember, the higher the number, the wider the selection becomes. So don't type in too high a number or else the selection will go beyond the outline and you end up with colors outside the lines.
Now, click on the layer underneath the doodle, and fill that layer with white. You can simultaneously press Shift+F5 to fill it and just choose white for the Foreground Color. That's how I flood fill my layers.
 The layer under the tree is now ghostly white. One reason I do this just to make sure that when I merge the layers later on, I won't have unsightly gaps in the colored drawing. The white serves as the solid "foundation." Another reason is because I work better this way, it gives me the semblance of working with a real white paper, kwim?
Now I create a new layer in between the lineart (original) tree and the white layer. This is the layer which I will fill with my desired color.

I go back to the original doodle layer, then click on the inside of the leaves with the use of the magic wand. Same way I did earlier, I expand the selection to 2.
I switch to the "sandwiched" layer again, then flood fill it with the color green.

I create another layer under the leaves, and I repeat the magic wand selection but this time on the trunk and the branch, expand selection, and flood fill it with the color brown this time. Just be conscious of your layers! Make sure that when you're using the magic wand, you're on the layer with the doodle. And when you're filling with color, you're on the layer where you should be doing that. This is why naming your layers helps a lot.
 So now I got the tree all colored up!
This is the most basic and the quickest way to color the lineart .png doodles. I can now merge all the layers and save it as .png and plop it on my design projects. Or, I can also play around with it more...
If you want to add a little pop to the doodles, you can apply effects and styles to the colored layers.
With the green leaves layer selected I click on the fx button at the bottom of the layer menu and click on Inner Shadow.
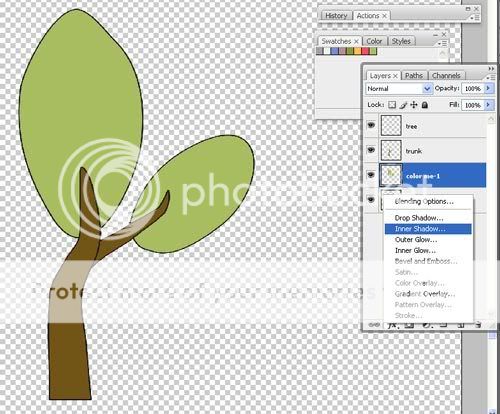
The Layer Style box pops up. I click on that color box beside the Blend Mode and another box appears, asking me to choose the color I want the inner shadow to be. So I chose a darker shade of the green I used to fill the leaves and clicked ok.
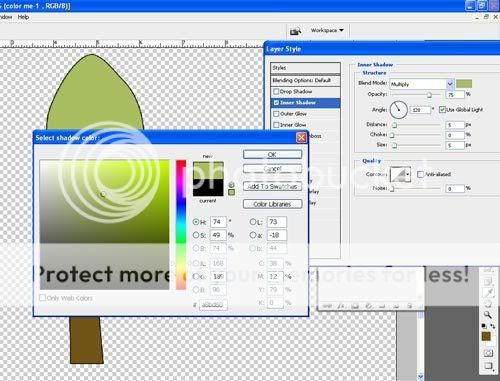
The leaves now have a slight shading and definition to it. Play around with the opacity of the blending mode, just don't make the inner shadow too dark.
You can also give the center shading more highlight. Just click on Inner Glow and play around with the opacity and choke levels. Just make sure that you got the Center option selection and the color of the glow should be a lighter shade of the layer color.

Moving on, I now do to the trunk and branch the same thing I did with the leaves. If you're lazy like I am (hehe), you can copy the layer style of the leaves and then paste it on the layer of the trunk and just tweak the colors to brown shades. Right click on the layer and choose Copy Layer Style and then go to the next layer, right click and select Paste Layer Style. This way I don't have to repeat the entire fx process for each layer.

Now the tree looks more interesting than the first color job, doesn't it? I can merge all the layers here now, save it as .png and give myself a pat in the back for a job well done.
But wait! I can still make this doodle look even more interesting. Yep, with the use of textures!
So I leave the tree unmerged. I then open a texture/overlay. I'm a huge fan of Amanda Rockwell's textures (she's got tons of them and they're all top notch quality). So for this doodle, I'll use one of hers that's scratchy and grungy and textured all at the same time, and open it up in Photoshop.

I select a portion from the overlay, just enough to cover the leaves, and then drag it over the doodle file. You can also just drag the entire overlay into the doodle file, but that would mean packing in more unnecessary "pounds" to my file size. Keywords: lean and mean.

So now I clip the texture over the colored leaves layer. I then play with the blending mode and opacity of the clipped layer. I want it to look grungy, but I also want the layer effects of the colored leaves to show through (ie, inner shadow/inner glow). Sometimes, the multiply mode works best while other times, it's linear burn or color burn. It depends on the texture I'm using and the colors. You should play with the blending modes each and every time.
I once again select a portion from the same texture, drag it over to the tree file, clip it on the colored layer of the trunk and branch, play with the blending modes till I get that textured, grungy look I'm after.
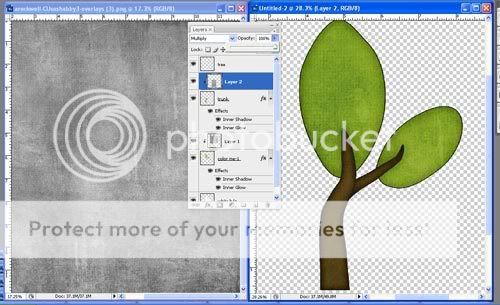
Now, isn't she a beauty? Definitely more interesting, and the tree pops out with the textured look.
At this point, I can compare the three "looks" that I was able to give the tree. The first look was basic and classic, like a white T-shirt paired with dark jeans and pearls.
The second look had a layer style applied and looked a tad more interesting, like using large, aviator sunglasses to go with the white shirt-dark-jeans-and-pearl get-up.
The third one, with textures clipped over it is more trendy and fetching, like slipping on fire engine-red stilettos, smearing on red lipstick and deep, smoky eyes and nude lipstick.
Now, another tip- you can grab some "ready-to-wear" layer styles being sold in digiscrap shops to apply them to the doodles. One of my current favorites is Flerg's Coloured Krafts style set. When I need a quick, hassle-free color job, I just load her styles and apply it on my doodles. It already has the cardboard texture and inner shadow effect applied to it, so it's quick 'n easy!
So that's it! Three ways to color the lineart .png doodles. Next post I'll show you more ways that you can customize the doodles, this time with the layered .psd templates along with how you can color the doodles using different Photoshop brushes and the burn tool.
I only hope that I was able to explain the process very clearly. If you need more clarifications, please feel free to croak them in this post's comment area.
Now, if you don't mind, I'd like to insert a quick ad here :-) The tree I used for this tutorial is from my Doodle Mix 2 pack which you can buy (for commercial use) at ZZS.
If you've reached this far, then you definitely deserve a freebie! (This is most likely the longest post I've made on this blog. Whew!) I'm giving away the three colored trees that I was able to come up with in the making of this tutorial. Please take note that this freebie is for personal use only because I used a texture from Amanda Rockwell and Flerg's layer styles on this set.
So here goes:
I'm doing this the old-fashioned, scissor-and-pen way. I wrote down the names of those who "croaked"(pic above). Then cut 'em up, folded each piece and dropped them in my cool-looking container:
Gave it a little shake then reached inside with eyes shut and drew out :
Congratulations, Sarah! You get for free Doodle Mix 1! How cool! Email me asap so I can send you your prize (my addie is on my sidebar).
You can purchase Doodle Mix 1 over at Scrap-Team Shop and Zig Zag Scraps.
I think Sarah is meant to be the winner for this giveaway because she has been hinting for some time now that she'd like to learn how to color my doodles. So I whipped up a tut for this post. I'm afraid I couldn't make it a short tutorial, as the most effective ones are those that are peppered with step-by-step images. Instead, I'll just try to make it as clear as possible. Read on...
Edit: TJ, I just found your comment after I published this post. I'll give you an additional "entry" to my next giveaway raffle draw. :-)
********
There are a gazillion ways on how you can customize my doodles. Especially since most of my doodle packs come in two formats- layered, .psd (Photoshop) and lineart (outline) .png.
Personally, I find the lineart .png's the quickest to color. But I have more fun with the layered .psd templates as they are more versatile and I have more options in customizing the drawings.
I broke down the How To Color tutorial in two parts. For the first part, I'll show you how I color the lineart .png. I'll tackle the layered .psd's in the second part (next post).
Please take note that I'm using Photoshop CS3 in this tutorial, so some instructions may be different if you are using either another graphic program or a lower or higher version of PS.
Also, click on the images below if you want to see them bigger.
Ok first, open a lineart .png file. I used this tree which is one of the doodles you can find in my Doodle Mix 2 pack (now available at ZigZag Scraps, but more of that in my next post too).
I dragged the drawing to a 12x12, 300 dpi file. It's easier to color them this way.
I created a layer underneath the doodle. I like to rename my layers so it's easier for me to find the layer that I need.
Using the magic wand, I clicked inside all the parts of the tree that need to be colored. In this case, the two huge leaves and the trunk and branch. Before clicking, make sure you are on the doodle layer and not on the new layer underneath it. Now the ants start marching inside the outline.
With the ants are marching, click Select, Modify, Expand.
The Expand Selection box pops up. I put in 2.
Anything between 1 and 2 should be ok. What this does is it expands your selection to overlap into the line, so that when you start coloring, there won't be a gap between the outline and the color.
You can see in the screencap above the selection reaching into the outline, but not going beyond it. I want the insides of the drawing fully colored end to end, cover to cover :-) Just remember, the higher the number, the wider the selection becomes. So don't type in too high a number or else the selection will go beyond the outline and you end up with colors outside the lines.
Now, click on the layer underneath the doodle, and fill that layer with white. You can simultaneously press Shift+F5 to fill it and just choose white for the Foreground Color. That's how I flood fill my layers.
The layer under the tree is now ghostly white. One reason I do this just to make sure that when I merge the layers later on, I won't have unsightly gaps in the colored drawing. The white serves as the solid "foundation." Another reason is because I work better this way, it gives me the semblance of working with a real white paper, kwim?Now I create a new layer in between the lineart (original) tree and the white layer. This is the layer which I will fill with my desired color.
I go back to the original doodle layer, then click on the inside of the leaves with the use of the magic wand. Same way I did earlier, I expand the selection to 2.
I switch to the "sandwiched" layer again, then flood fill it with the color green.
I create another layer under the leaves, and I repeat the magic wand selection but this time on the trunk and the branch, expand selection, and flood fill it with the color brown this time. Just be conscious of your layers! Make sure that when you're using the magic wand, you're on the layer with the doodle. And when you're filling with color, you're on the layer where you should be doing that. This is why naming your layers helps a lot.
So now I got the tree all colored up!This is the most basic and the quickest way to color the lineart .png doodles. I can now merge all the layers and save it as .png and plop it on my design projects. Or, I can also play around with it more...
If you want to add a little pop to the doodles, you can apply effects and styles to the colored layers.
With the green leaves layer selected I click on the fx button at the bottom of the layer menu and click on Inner Shadow.
The Layer Style box pops up. I click on that color box beside the Blend Mode and another box appears, asking me to choose the color I want the inner shadow to be. So I chose a darker shade of the green I used to fill the leaves and clicked ok.
The leaves now have a slight shading and definition to it. Play around with the opacity of the blending mode, just don't make the inner shadow too dark.
You can also give the center shading more highlight. Just click on Inner Glow and play around with the opacity and choke levels. Just make sure that you got the Center option selection and the color of the glow should be a lighter shade of the layer color.
Moving on, I now do to the trunk and branch the same thing I did with the leaves. If you're lazy like I am (hehe), you can copy the layer style of the leaves and then paste it on the layer of the trunk and just tweak the colors to brown shades. Right click on the layer and choose Copy Layer Style and then go to the next layer, right click and select Paste Layer Style. This way I don't have to repeat the entire fx process for each layer.
Now the tree looks more interesting than the first color job, doesn't it? I can merge all the layers here now, save it as .png and give myself a pat in the back for a job well done.
But wait! I can still make this doodle look even more interesting. Yep, with the use of textures!
So I leave the tree unmerged. I then open a texture/overlay. I'm a huge fan of Amanda Rockwell's textures (she's got tons of them and they're all top notch quality). So for this doodle, I'll use one of hers that's scratchy and grungy and textured all at the same time, and open it up in Photoshop.
I select a portion from the overlay, just enough to cover the leaves, and then drag it over the doodle file. You can also just drag the entire overlay into the doodle file, but that would mean packing in more unnecessary "pounds" to my file size. Keywords: lean and mean.
So now I clip the texture over the colored leaves layer. I then play with the blending mode and opacity of the clipped layer. I want it to look grungy, but I also want the layer effects of the colored leaves to show through (ie, inner shadow/inner glow). Sometimes, the multiply mode works best while other times, it's linear burn or color burn. It depends on the texture I'm using and the colors. You should play with the blending modes each and every time.
I once again select a portion from the same texture, drag it over to the tree file, clip it on the colored layer of the trunk and branch, play with the blending modes till I get that textured, grungy look I'm after.
Now, isn't she a beauty? Definitely more interesting, and the tree pops out with the textured look.
At this point, I can compare the three "looks" that I was able to give the tree. The first look was basic and classic, like a white T-shirt paired with dark jeans and pearls.
The second look had a layer style applied and looked a tad more interesting, like using large, aviator sunglasses to go with the white shirt-dark-jeans-and-pearl get-up.
The third one, with textures clipped over it is more trendy and fetching, like slipping on fire engine-red stilettos, smearing on red lipstick and deep, smoky eyes and nude lipstick.
Now, another tip- you can grab some "ready-to-wear" layer styles being sold in digiscrap shops to apply them to the doodles. One of my current favorites is Flerg's Coloured Krafts style set. When I need a quick, hassle-free color job, I just load her styles and apply it on my doodles. It already has the cardboard texture and inner shadow effect applied to it, so it's quick 'n easy!
So that's it! Three ways to color the lineart .png doodles. Next post I'll show you more ways that you can customize the doodles, this time with the layered .psd templates along with how you can color the doodles using different Photoshop brushes and the burn tool.
I only hope that I was able to explain the process very clearly. If you need more clarifications, please feel free to croak them in this post's comment area.
Now, if you don't mind, I'd like to insert a quick ad here :-) The tree I used for this tutorial is from my Doodle Mix 2 pack which you can buy (for commercial use) at ZZS.
If you've reached this far, then you definitely deserve a freebie! (This is most likely the longest post I've made on this blog. Whew!) I'm giving away the three colored trees that I was able to come up with in the making of this tutorial. Please take note that this freebie is for personal use only because I used a texture from Amanda Rockwell and Flerg's layer styles on this set.


8 croaks:
at: October 11, 2009 at 11:24 PM said...
Congrats Sarah! Thanks for the great tutorial and freebie Rachelle!
at: October 11, 2009 at 11:25 PM said...
Wow! Thanks so much for this great tutorial! I've got tons of doodles but never knew how to color them. This makes it so easy! Thanks again.....MWAH!
at: October 12, 2009 at 5:35 AM said...
I loved this tutorial. Thank you for taking the time to share your tips. I had been using the color dodge and burn tools to add dimension to my doodles, but your inner shadow and glow tips sound so much easier!
at: October 12, 2009 at 10:02 PM said...
love that tree - thank you very much
at: October 12, 2009 at 10:23 PM said...
Wow what a wonderful TUT you did here and love the freebie doodle! I love your doodles and I very much enjoyed and appreciate the TUT on how to color them! You Rock!
at: October 13, 2009 at 2:25 PM said...
Rach..... you totally ROCKED this tut!!! And I am so glad to see that I was NOT the only one who didnt know what to do with these gorgeous doodles.
Thank you for choosing me as the winner!! And now I need to copy this tut! Oh, and 6 hours... my goodness girl. Posting tuts online does take forever... especially in blogger. Wordpress is a bit easier because you can insert the pic exactly where you want it.... I have written a couple of tuts for Ellie Lash's CT blog and yea, definitely a couple hours worth of time.
Now I am off to post your blog as a must follow for my twitter and facebook friends.
at: October 17, 2009 at 12:38 AM said...
Thanks for a great tutorial it's very useful for me.
I've got some problem ..can't download file...so sad.
at: May 16, 2010 at 8:46 AM said...
Thanks so much for this tut!!! I'll not go into details but my technique before was incredibily long winded. I knew ther must be a simpler way but couldnt figure it out.
Alison :)
Post a Comment